
GW section will often be out of date as GW setups are typically brainstormed in the months leading up to GW. Setups will typically be methods from the prior GW with minor updates for new content. Additionally, since GW bosses differ every run final setups won’t be known until GW actually begins.
Wind Unite and Fight 2023
 |  |  |  |  |
Characters
General


Ougi


Auto


Backline


Progression
The first goal for meat farming is being able to clear EX and EX+ in one turn. The easiest way to achieve this is with teamwide charge attacks. While there are a few ways to do this, the easier way is with Relic’s Limit burst. Although the setups below are fairly optimal for this level, they cover the basic methods to this level of OTK. For weaker grids, additional button presses for strong buffs or skills and summon calls may be needed to reach that one turn. Ultimately, the goal will be to reduce the button presses as much as possible to make meat farming faster, but having a reliable one turn kill is the highest priority.
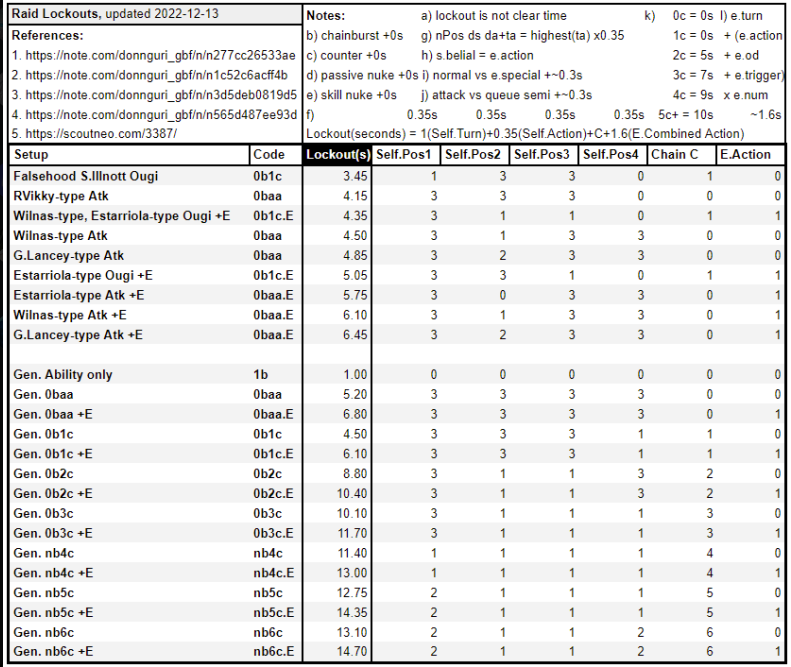
From here on out, the way to improve OTKs is by reducing lockout, the time between turns. Different actions increase lockout with the bigest being from CA chains. The chain lockout reduces with fewer CAs with a 4 chain being significantly more than 3 chain. Using the extra 10% starting charge from the wonder for unlocking every eternal, eternals can start with 100% charge with double Huanglong and crew buffs with zero button presses. Any charge behind them will also CA unless they have reduced charge gain. This is the core to 0B3C, 0B2C, and 0B1C setups. Alternatively, chains can be avoided altogether with a single button press or a strong summon call. Due to avoiding a chain, they can be faster 2C.
In the final stages, ping plays the greatest inhibitor in going faster. While time can be shaved by further reducing actions by using tag team skills instead of attacking, no boss action, or reducing the number of characters attacking, if you don’t notice the reduced lockout on your ping, you have hit your speed limit. As a result, some people may run Kaguya as a support and/or main summon to help increase drops per run. It should be noted while this does offer a notable increase in drops, it is not notable enough to take a major speed hit for it. But if you already hit your limit it will make meat farming faster.
Lockout
Lockout Calculation Table
Setups
2B4C


")


Rotation
- Turn 1
- Engage Augments
 Gain 5 Machine Cell (Max: 5) and restore HP (Healing cap: 2000).
(When HP is 50% or above: Also gain Strength (45%-15%, 3T).)
Level 30:
(When HP is below 50%: Also gain Jammed (30%-90%, 3T).) , Limit Burst All allies gain Charge Bar, C.A. DMG Boosted (1 time), and C.A. DMG Cap Boosted (1 time) based on number of Machine Cell.
(Consumes all Machine Cell.) 
- Engage Augments
Notes
- Mirin is hard to replace due to her huge ougi and nukes.
- Mirin needs either Windhose MH, or Arthur(SR) / Charlotta(Water) to reach 200% CB.
- Every character is replaceable with anyone with skill nukes like S.Shion, Petra, Elea or a large ougi.
- SPC Daur da Blao can replace the beaks.
1B4C

")


Rotation
- Turn 1
- Splitting Spirit
 Convert caster’s HP to charge bar (3% charge bar for every 250 HP consumed, up to 100% charge bar).
(Consumes up to 50% of current HP.)
- Splitting Spirit
Notes
- Makes use of Kanabo’s nuke on ougi.
- Another weapon with a skill nuke can be used instead if desired.
- Every character is replaceable with anyone with skill nukes or a large ougi.
0B4C

")
")

Notes
- Grand Charlotta provides a 40% Charge Bar boost to your party allowing for 0 button setups without the need of an Eternal.
- Every character except Charlotta is replaceable with anyone with skill nukes or a large ougi.
0B3C

Notes
- The standard 3 chain setup.
- Grid is fairly flexible. Work with what you have.
- Every character except Siete is replaceable with anyone with skill nukes or a large ougi.
0B2C
Traditional


Notes
- Freyr or Apple key both work.
- Nio can be replaced by Siete.
- Elea can replaced by other skill nukers like S.Shion or Petra.
- Estarriola can be replaced by Petra.
Charlotta
")


Notes
- Charlotta offers a 40% boost to Charge Bar at start, allowing you to 2 chain with only MC and her and a single Huanglong.
1B1C

")

")


Rotation
- Turn 1
- Splitting Spirit
Convert caster’s HP to charge bar (3% charge bar for every 250 HP consumed, up to 100% charge bar).
(Consumes up to 50% of current HP.)
- Splitting Spirit
Notes
- Uses Falsehood ougi for teamwide double strike.
- Narmaya and V.Grim can be replaced with other GTA characters.
- S.Anila can be replaced with Nio or Estarriola.
0B0C1S
")


Rotation
- Turn 1

Notes
- Bubs call deals large damage and increases damage output for other characters.
- Character and grid choices are very flexible.
- Character replacements can be GTA characters or ones with skill nukes.
0B1C
Soldier

")


Reference Video
Notes
- Alternative 1C setup using soldier for more damage.
- X.Meteon can be replaced by S.Shion.
Kengo

Reference Video
Notes
- 1C setup using Nio to push into 50 and killing with reactive nukes.
- S.Shion can be replaced by X.Meteon.
Berserker

")
")


Reference Video
Notes
- Uses Ferry to allow MC to ougi with Falsehood opus without button presses.
- Needs to kill with S.Anila to avoid 2C.
0B0C
Manadiver


Notes
- Manadiver’s autonuke deals high amounts of damage.
Apsaras

Reference Video
Notes
- Apasaras variant that kill without S.Tia with a strong enough grid.
Tag Team Only


Rotation
- Turn 1
- Tag Team
 All allies instantly perform a normal attack without using up a turn.
- Tag Team
Notes
- Tag Team is less lockout than attacking since it uses skill lockout.