
Light Unite and Fight 2025


Progression
The first goal for meat farming is being able to clear EX and EX+ in one turn. The easiest way to achieve this is with teamwide charge attacks. While there are a few ways to do this, the easier way is with Relic’s Limit burst. Although the setups below are fairly optimal for this level, they cover the basic methods to this level of OTK. For weaker grids, additional button presses for strong buffs or skills and summon calls may be needed to reach that one turn. Ultimately, the goal will be to reduce the button presses as much as possible to make meat farming faster, but having a reliable one turn kill is the highest priority.
From here on out, the way to improve OTKs is by reducing lockout, the time between turns. Different actions increase lockout with the bigest being from CA chains. The chain lockout reduces with fewer CAs with a 4 chain being significantly more than 3 chain. Using the extra 10% starting charge from the wonder for unlocking every eternal, eternals can start with 100% charge with double Huanglong and crew buffs with zero button presses. Any charge behind them will also CA unless they have reduced charge gain. This is the core to 0B3C, 0B2C, and 0B1C setups. Alternatively, chains can be avoided altogether with a single button press or a strong summon call. Due to avoiding a chain, they can be faster 2C.
In the final stages, ping plays the greatest inhibitor in going faster. While time can be shaved by further reducing actions by using tag team skills instead of attacking, no boss action, or reducing the number of characters attacking, if you don’t notice the reduced lockout on your ping, you have hit your speed limit. As a result, some people may run Kaguya as a support and/or main summon to help increase drops per run. It should be noted while this does offer a notable increase in drops, it is not notable enough to take a major speed hit for it. But if you already hit your limit it will make meat farming faster.
Lockout
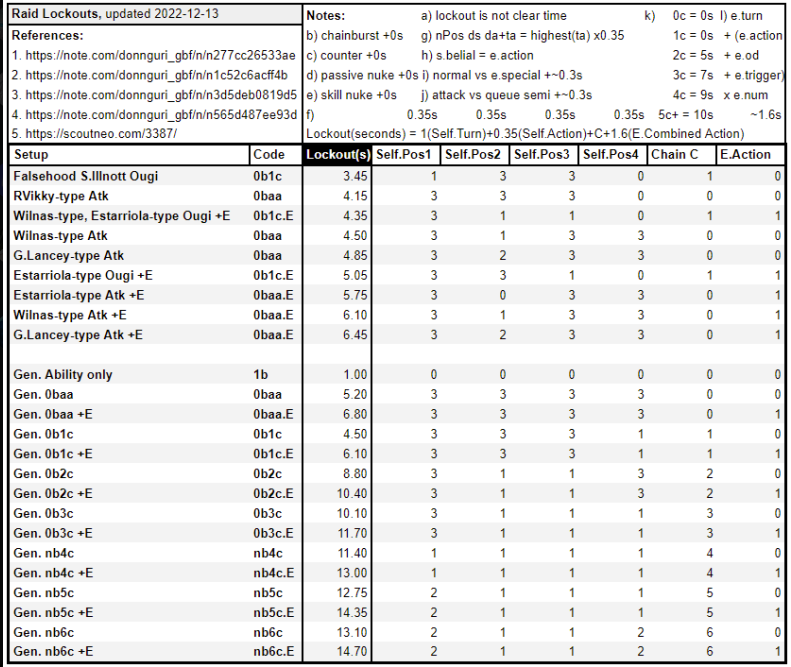
Lockout, as stated before, is the time between actions the player that they are unable to perform another action. Lockout variest heavily on the type of actions performed. This also carries between battles. So with a high enough lockout and fast enough reset between battles the player will limited by this time they can’t perform an action. This is most notcible with CA chains where even with bad ping it is easy to run into lockout.
Below is a table showing how to calculate lockout for those interested in figuring their exact lockout.
| Action | Lockout (seconds) | Comments |
| Base Attack | 1 | Base lockout that occurs when the attack button is pressed. |
| Action | 0.35 | Lockout that occurs on any action like a normal attack, skill press, or CA. For double and triple attacks, this is doubled (0.7) and tripled (1.05). |
| Enemy Turn | ~1.6 | For EX+ averages to 1.6. Enemy Turn + (Enemy Action + Overdrive + Trigger) * Enemy Modifer = ~1.6 |
| Counter | 0 | |
| Skill Nuke | 0 | |
| Passive Nuke | 0 | |
| Chainburst | 0 | |
| 2 CAs | 5 | |
| 3 CAs | 7 | |
| 4 CAs | 9 | |
| 5+ CAs | 10 | |
| Multistrike | 0 | Uses the lockout of the highest action performed rather than counting all actions done. Triple Strike with 9 total TAs = 3*0.35 = 1.05s instead of 3.15s. Single Attack => Triple Attack = 3*0.35 = 1.05s. |
| Instant Attack | 0.35 per character that attacks | For a teamwide attack like Tag Team |
| Summon Calls | 0.35 |
Lockout (s) = 1 (Self Turn) + 0.35(Self Actions) + Chainburst + 1.6 (Enemy Action)
Additional Reference
Characters
Below is a short list of characters useful for OTK and what they provide. For more information check the OTK character section or use GBFAS to search for specific mechanics.


")


Notation
Charge Attacks Setups
The following setups focus primarily on using Charge Attacks to defeat the boss. CA setups have higher lockout than Normal Attack setups making them slower overall but are easier to begin with and have more available character options.
2B4C 
Relic Buster provides a very easy way for full teamwide charge thanks to Limit Burst
![]() All allies gain Charge Bar, C.A. DMG Boosted (1 time), and C.A. DMG Cap Boosted (1 time) based on number of Machine Cell.
All allies gain Charge Bar, C.A. DMG Boosted (1 time), and C.A. DMG Cap Boosted (1 time) based on number of Machine Cell.
(Consumes all Machine Cell.)
. This provides the base for the most basic form of OTK. Character selection is very flexible. Additional buttons or summon calls can be added as needed for weaker grids

")


Rotation
- Turn 1
- Relic Buster
 Gain 5 Machine Cell (Max: 5) and restore HP (Healing cap: 2000).
(When HP is 50% or above: Also gain Strength (45%-15%, 3T).)
Level 30:
(When HP is below 50%: Also gain Jammed (30%-90%, 3T).) All allies gain Charge Bar, C.A. DMG Boosted (1 time), and C.A. DMG Cap Boosted (1 time) based on number of Machine Cell.
(Consumes all Machine Cell.) 
- Relic Buster
Notes
- Every character is replaceable with anyone with skill nukes like Cosmos
 or Sturm (Summer) or with a large CA like Robomi.
 - Nobita
 or Silva (Light)
 can be slotted backline for more damage.
1B5C
Having main and support Huanglong along with the crew buffs provides 90% charge to everyone. Using Full Arsenal III![]() Gain C.A. Instant Standby, ATK Up (50%, Multiplier: Normal, 1T), and Chain Burst DMG Boosted (30%, 1T).
Gain C.A. Instant Standby, ATK Up (50%, Multiplier: Normal, 1T), and Chain Burst DMG Boosted (30%, 1T).
Level 30:
Also gain C.A. DMG Boosted (1 time) (20%) and C.A. DMG Cap Boosted (1 time) (10%).
or Splitting Spirit![]() Convert caster’s HP to charge bar (3% charge bar for every 250 HP consumed, up to 100% charge bar).
Convert caster’s HP to charge bar (3% charge bar for every 250 HP consumed, up to 100% charge bar).
(Consumes up to 50% of current HP.)
you can 4C with only a single button press.


Rotation
- Turn 1
- Catura
 S1
S1 Caster and MC gain Charge Boost (100%).
Restore caster and MC’s HP (Healing cap: 12021 (This already takes the 20% healing specs boost into account)).
(From 2nd cast onward: Also remove all debuffs from caster and MC.
From 3rd cast onward: Caster and MC also gain C.A. Reactivation (1 time).)
- Catura
Reference
Notes
- Every character is replaceable with anyone with skill nukes like Cosmos or Sturm (Summer) or with a large CA like Robomi.
- Nobita or Silva (Light) can be slotted backline for more damage.
1B4C
Having main and support Huanglong along with the crew buffs provides 90% charge to everyone. Using Full Arsenal III![]() Gain C.A. Instant Standby, ATK Up (50%, Multiplier: Normal, 1T), and Chain Burst DMG Boosted (30%, 1T).
Gain C.A. Instant Standby, ATK Up (50%, Multiplier: Normal, 1T), and Chain Burst DMG Boosted (30%, 1T).
Level 30:
Also gain C.A. DMG Boosted (1 time) (20%) and C.A. DMG Cap Boosted (1 time) (10%).
or Splitting Spirit![]() Convert caster’s HP to charge bar (3% charge bar for every 250 HP consumed, up to 100% charge bar).
Convert caster’s HP to charge bar (3% charge bar for every 250 HP consumed, up to 100% charge bar).
(Consumes up to 50% of current HP.)
you can 4C with only a single button press.

")


Rotation
- Turn 1
- Catura S1
Caster and MC gain Charge Boost (100%).
Restore caster and MC’s HP (Healing cap: 12021 (This already takes the 20% healing specs boost into account)).
(From 2nd cast onward: Also remove all debuffs from caster and MC.
From 3rd cast onward: Caster and MC also gain C.A. Reactivation (1 time).)
- Catura
Reference
0B4C
[[[c|ferry -ssr]]] provides an additional 40% charge to party allowing for an easier 0 button setup. It also removes the need for double Huanglong which means you can have a higher damage output.
")


")


Reference
Notes
- Every character except Ferry is replaceable with anyone with skill nukes like Cosmos or Sturm (Summer) or with a large CA like Robomi.
- Nobita or Silva (Light) can be slotted backline for more damage.
000 0B1S1C
The Agastia manatura is capable of adding over 10m skill damage to a CA. Combine this with Triple Zero’s strong call, you can easily kill the boss with the first CA.


Rotation
- Turn 1
Notes
- Extra slots can be any passive buffer like Lyria (Event)
 or Uruki
 .
. - For a weaker grid, use support Bahamut
 for more damage from Triple Zero.
0B3C

")


Reference
0B2C
")
")

Reference
Normal Attack Setups
The following setups used Normal Attack to defeat the boss. They are faster than CA setups since they have much lower lockout. The lockout is low enough that even pressing a button or two can be faster than most CA setups.
3B0C
Nehan is Light’s strongest buffer and his buttons are some of the highest value presses you can ask for when it comes to OTK.


Rotation
- Turn 1
- Nehan S1
 All other Light allies gain Zen (Multiplier: Perpetuity, 3T).
S2
All other Light allies gain Zen (Multiplier: Perpetuity, 3T).
S2 All other Light allies gain Wolf Tonic (3T).
S3
All other Light allies gain Wolf Tonic (3T).
S3 All other Light allies gain Double Strike (1t).
(Inflict Max HP Lowered (Stackable / Can’t be removed) (30% (90% Max)) on target allies.)
- Nehan
Reference
Notes
- Characters can be replaced by any other Staff or Axe prof characters.
1B1S0C
Calling Beelzebub makes for an easy OTK since it takes out a large chunk HP as well as the strength of the Bore debuff. Additionally, despite the call it is faster as well due to lower lock. Make sure to use a short animation skin like Rose Queen
 or Bellringer Angel
 ]. Alternatively, Triple Zero can be used but make sure to turn CAs off with it.

")
")


Rotation
- Turn 1
- Beelzebub
- Ferry (SSR) S3
 All allies gain TA Up (100%, 4T) and Bonus Light DMG (30%, 4T).
Inflict Shorted (4T) on all allies.
(Consumes 100% of all allies’ charge bars.)
- Beelzebub
Reference
Notes
- Characters other than Ferry can be replaced by any other Katana or Gun prof characters.
1B1S0C
Calling Beelzebub makes for an easy OTK since it takes out a large chunk HP as well as the strength of the Bore debuff. Additionally, despite the call it is faster as well due to lower lock. Make sure to use a short animation skin like Rose Queen or Bellringer Angel]. Alternatively, Triple Zero can be used but make sure to turn CAs off with it.


Rotation
- Turn 1
- Beelzebub
- Ferry (SSR) S3
All allies gain TA Up (100%, 4T) and Bonus Light DMG (30%, 4T).
Inflict Shorted (4T) on all allies.
(Consumes 100% of all allies’ charge bars.)
- Beelzebub
Notes
- Characters can be replaced by any other Staff or Axe prof characters.
2B0C
Nehan is Light’s strongest buffer and his buttons are some of the highest value presses you can ask for when it comes to OTK.


Rotation
- Turn 1
- Nehan S1
All other Light allies gain Zen (Multiplier: Perpetuity, 3T).
S3
All other Light allies gain Double Strike (1t).
(Inflict Max HP Lowered (Stackable / Can’t be removed) (30% (90% Max)) on target allies.)
- Nehan
Reference
Notes
- Characters can be replaced by any other Staff or Axe prof characters.
Bubs Attack
Calling Beelzebub makes for an easy OTK since it takes out a large chunk HP as well as the strength of the Bore debuff. Additionally, despite the call it is faster as well due to lower lock. Make sure to use a short animation skin like Rose Queen or Bellringer Angel]. Alternatively, Triple Zero can be used but make sure to turn CAs off with it.
![]()
")
![]()

")


1B1C
The CA effect of the Falsehood chain provides teamwide double strike. Thus with a simple press to Full Arsenal III![]() Gain C.A. Instant Standby, ATK Up (50%, Multiplier: Normal, 1T), and Chain Burst DMG Boosted (30%, 1T).
Gain C.A. Instant Standby, ATK Up (50%, Multiplier: Normal, 1T), and Chain Burst DMG Boosted (30%, 1T).
Level 30:
Also gain C.A. DMG Boosted (1 time) (20%) and C.A. DMG Cap Boosted (1 time) (10%).
or Splitting Spirit![]() Convert caster’s HP to charge bar (3% charge bar for every 250 HP consumed, up to 100% charge bar).
Convert caster’s HP to charge bar (3% charge bar for every 250 HP consumed, up to 100% charge bar).
(Consumes up to 50% of current HP.)
you can have 6 rounds of ally normal attacks.

")


1B0C (Nehan)
Nehan provides double strike to the team except self. Paired with strong buffers and TA confirmed for grid, this will be all you need.

")


Rotation
- Turn 1
- Nehan S3
All other Light allies gain Double Strike (1t).
(Inflict Max HP Lowered (Stackable / Can’t be removed) (30% (90% Max)) on target allies.)
- Nehan
Reference
1B0C (Viking)
The Viking CCW [[[c|norden-labrys]]] autocasts Banahogg![]() 2-hit superior Elemental damage to a foe (Damage cap: ~370,000 per hit).
2-hit superior Elemental damage to a foe (Damage cap: ~370,000 per hit).
Inflict DEF Lowered (25%, 180s).
If main or auxiliary weapon is a sabre: Boost to number of hits (2 times).
If main or auxiliary weapon is an axe: Also inflict status DEF Down (25%, 180s).
at the end of the turn for a massive nuke.

Rotation
- Turn 1
- Jeanne d’Arc (Grand)
 S1
S1 Inflict ATK Down 4 (25%, Accuracy: 120%, 4t), DEF Down 4 (25%, Accuracy: 120%, 4t), and Divine Sentence 4 (1% of foe’s max HP Damage cap: 30,000, Accuracy: 90%, 4t) on all foes.
- Jeanne d’Arc (Grand)
Reference
0B0C Viking
The Viking CCW [[[c|norden-labrys]]] autocasts Banahogg![]() 2-hit superior Elemental damage to a foe (Damage cap: ~370,000 per hit).
2-hit superior Elemental damage to a foe (Damage cap: ~370,000 per hit).
Inflict DEF Lowered (25%, 180s).
If main or auxiliary weapon is a sabre: Boost to number of hits (2 times).
If main or auxiliary weapon is an axe: Also inflict status DEF Down (25%, 180s).
at the end of the turn for a massive nuke.
")
")


References
Notes
- Requires 7% TA on Yurius, 2% TA on Levin Sisters, 2% TA on Albert, and 5% TA on Ragazzo.
0B0C Heimdallr 
FLB Heimdallr offers as main summon the ability to start with a crest. This pairs great with the skill nukes from Manadiver
 to offer a large source of damage.


References
Notes
- Requires 7% TA on Naru.
0B0C Ura
Golden Fists of Ura provides teamwide 30% normal amp as well as high counter damage making it great for OTK situations.

")


References
Notes
- Needs 2% TA on Levin Sisters.
Orologia
The lowest lockout method uses the single skill Transcendent Blue![]() 11-hit Elemental damage to a foe (2600% total / Damage cap: ~4,000,000 total). MC gains <span class=”tooltip” >Power of the Boundary<span class=”tooltiptext” style=””><span class=”image_link”><span class=”tooltip” style=”border-bottom: 0;”>[[File:status_7980_1.png|25px|link=Status Effects]][[Status Effects|Power of the Boundary (20% ATK Up)]]<span class=”tooltiptext”>ATK is boosted (Can’t be removed)<br /><span class=”hr”></span><strong>Strength</strong>: 20%<span class=”hr”></span><strong>Multiplier</strong>: [[Damage_Formula/Detailed_Damage_Formula#Perpetuity boost|Perpetuity]]<span class=”hr”></span><strong>Duration</strong>: 5 turns</span></span></span><br /><span class=”image_link”><span class=”tooltip” style=”border-bottom: 0;”>[[File:status_7980_2.png|25px|link=Status Effects]][[Status Effects|Power of the Boundary (30% DEF Up)]]<span class=”tooltiptext”>DEF is boosted (Can’t be removed)<br /><span class=”hr”></span><strong>Strength</strong>: 30%<span class=”hr”></span><strong>Duration</strong>: 5 turns</span></span></span><br /><span class=”image_link”><span class=”tooltip” style=”border-bottom: 0;”>[[File:status_7980_3.png|25px|link=Status Effects]][[Status Effects|Power of the Boundary (100% DA Up)]]<span class=”tooltiptext”>Double attack rate is boosted (Can’t be removed)<br /><span class=”hr”></span><strong>Strength</strong>: 100%<span class=”hr”></span><strong>Duration</strong>: 5 turns</span></span></span><br /><span class=”image_link”><span class=”tooltip”
from Orologia
11-hit Elemental damage to a foe (2600% total / Damage cap: ~4,000,000 total). MC gains <span class=”tooltip” >Power of the Boundary<span class=”tooltiptext” style=””><span class=”image_link”><span class=”tooltip” style=”border-bottom: 0;”>[[File:status_7980_1.png|25px|link=Status Effects]][[Status Effects|Power of the Boundary (20% ATK Up)]]<span class=”tooltiptext”>ATK is boosted (Can’t be removed)<br /><span class=”hr”></span><strong>Strength</strong>: 20%<span class=”hr”></span><strong>Multiplier</strong>: [[Damage_Formula/Detailed_Damage_Formula#Perpetuity boost|Perpetuity]]<span class=”hr”></span><strong>Duration</strong>: 5 turns</span></span></span><br /><span class=”image_link”><span class=”tooltip” style=”border-bottom: 0;”>[[File:status_7980_2.png|25px|link=Status Effects]][[Status Effects|Power of the Boundary (30% DEF Up)]]<span class=”tooltiptext”>DEF is boosted (Can’t be removed)<br /><span class=”hr”></span><strong>Strength</strong>: 30%<span class=”hr”></span><strong>Duration</strong>: 5 turns</span></span></span><br /><span class=”image_link”><span class=”tooltip” style=”border-bottom: 0;”>[[File:status_7980_3.png|25px|link=Status Effects]][[Status Effects|Power of the Boundary (100% DA Up)]]<span class=”tooltiptext”>Double attack rate is boosted (Can’t be removed)<br /><span class=”hr”></span><strong>Strength</strong>: 100%<span class=”hr”></span><strong>Duration</strong>: 5 turns</span></span></span><br /><span class=”image_link”><span class=”tooltip”
from Orologia to deal a massive nuke.


Rotation
- Turn 1
- Soldier

 11-hit Elemental damage to a foe (2600% total / Damage cap: ~4,000,000 total). MC gains <span class=”tooltip” >Power of the Boundary<span class=”tooltiptext” style=””><span class=”image_link”><span class=”tooltip” style=”border-bottom: 0;”>[[File:status_7980_1.png|25px|link=Status Effects]][[Status Effects|Power of the Boundary (20% ATK Up)]]<span class=”tooltiptext”>ATK is boosted (Can’t be removed)<br /><span class=”hr”></span><strong>Strength</strong>: 20%<span class=”hr”></span><strong>Multiplier</strong>: [[Damage_Formula/Detailed_Damage_Formula#Perpetuity boost|Perpetuity]]<span class=”hr”></span><strong>Duration</strong>: 5 turns</span></span></span><br /><span class=”image_link”><span class=”tooltip” style=”border-bottom: 0;”>[[File:status_7980_2.png|25px|link=Status Effects]][[Status Effects|Power of the Boundary (30% DEF Up)]]<span class=”tooltiptext”>DEF is boosted (Can’t be removed)<br /><span class=”hr”></span><strong>Strength</strong>: 30%<span class=”hr”></span><strong>Duration</strong>: 5 turns</span></span></span><br /><span class=”image_link”><span class=”tooltip” style=”border-bottom: 0;”>[[File:status_7980_3.png|25px|link=Status Effects]][[Status Effects|Power of the Boundary (100% DA Up)]]<span class=”tooltiptext”>Double attack rate is boosted (Can’t be removed)<br /><span class=”hr”></span><strong>Strength</strong>: 100%<span class=”hr”></span><strong>Duration</strong>: 5 turns</span></span></span><br /><span class=”image_link”><span class=”tooltip”
- Soldier
References
Past Years
UnF pages for prior years.