GW section will often be out of date as GW setups are typically brainstormed in the months leading up to GW. Setups will typically be methods from the prior GW with minor updates for new content. Additionally, since GW bosses differ every run final setups won’t be known until GW actually begins.
GW Pages
Progression
The first goal for meat farming is being able to clear EX and EX+ in one turn. The easiest way to achieve this is with teamwide charge attacks. While there are a few ways to do this, the easier way is with Relic’s Limit burst. Although the setups below are fairly optimal for this level, they cover the basic methods to this level of OTK. For weaker grids, additional button presses for strong buffs or skills and summon calls may be needed to reach that one turn. Ultimately, the goal will be to reduce the button presses as much as possible to make meat farming faster, but having a reliable one turn kill is the highest priority.
From here on out, the way to improve OTKs is by reducing lockout, the time between turns. Different actions increase lockout with the bigest being from CA chains. The chain lockout reduces with fewer CAs with a 4 chain being significantly more than 3 chain. Using the extra 10% starting charge from the wonder for unlocking every eternal, eternals can start with 100% charge with double Huanglong and crew buffs with zero button presses. Any charge behind them will also CA unless they have reduced charge gain. This is the core to 0B3C, 0B2C, and 0B1C setups. Alternatively, chains can be avoided altogether with a single button press or a strong summon call. Due to avoiding a chain, they can be faster 2C.
In the final stages, ping plays the greatest inhibitor in going faster. While time can be shaved by further reducing actions by using tag team skills instead of attacking, no boss action, or reducing the number of characters attacking, if you don’t notice the reduced lockout on your ping, you have hit your speed limit. As a result, some people may run Kaguya as a support and/or main summon to help increase drops per run. It should be noted while this does offer a notable increase in drops, it is not notable enough to take a major speed hit for it. But if you already hit your limit it will make meat farming faster.
Lockout
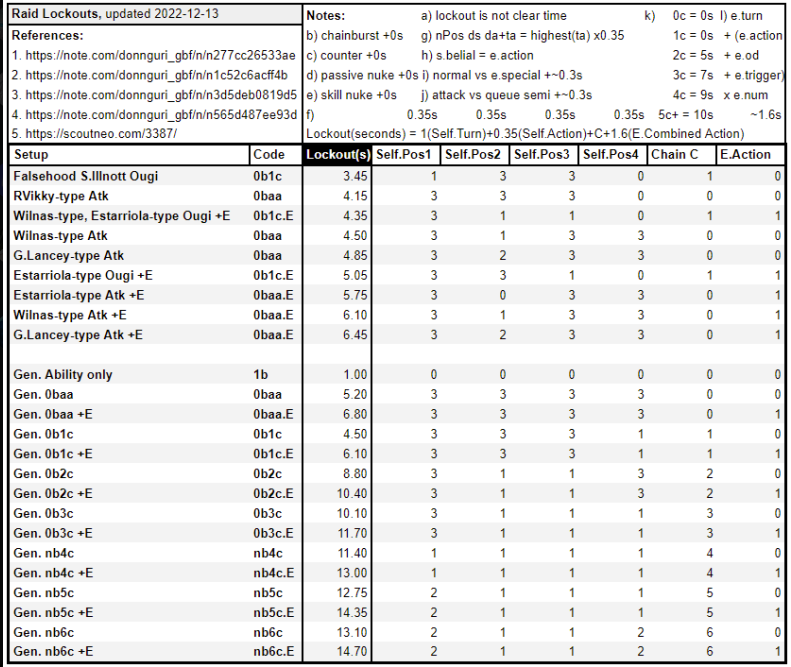
Lockout, as stated before, is the time between actions the player that they are unable to perform another action. Lockout variest heavily on the type of actions performed. This also carries between battles. So with a high enough lockout and fast enough reset between battles the player will limited by this time they can’t perform an action. This is most notcible with CA chains where even with bad ping it is easy to run into lockout.
Below is a table showing how to calculate lockout for those interested in figuring their exact lockout.
Characters
Below is a short list of characters useful for OTK and what they provide. For more information check the OTK character section or using GBFAS to search for specific mechanics.
Starting Charge
- Tien

- 10% with eternal wonder.
Large CAs
CA Nuke
Reactive Nuke
Auto Nuke
- Anderson

- Nezha (Yukata)

- Ragazzo

- Zeta (Grand)

- Nuke is after three ally TAs.
- Wilnas

- Dorothy and Claudia (Summer)

GTA
- Ragazzo

- Percival (Grand)

- Naoise (Fire)

- Nezha (Yukata)

- Requires 2 other primal allies.
Strengthened Autos
Passive Buffer
Setups
2B4C
Relic Buster provides a very easy way for full teamwide charge thanks to Limit Burst
![]() All allies gain Charge Bar, C.A. DMG Boosted (1 time), and C.A. DMG Cap Boosted (1 time) based on number of Machine Cell.
All allies gain Charge Bar, C.A. DMG Boosted (1 time), and C.A. DMG Cap Boosted (1 time) based on number of Machine Cell.
(Consumes all Machine Cell.)
. This provides the base for the most basic form of OTK. Character selection is very flexible. Additional buttons or summon calls can be added as needed for weaker grids
Rotation
- Turn 1
- Engage Augments
 Gain 5 Machine Cell (Max: 5) and restore HP (Healing cap: 2000).
(When HP is 50% or above: Also gain Strength (45%-15%, 3T).)
Level 30:
(When HP is below 50%: Also gain Jammed (30%-90%, 3T).) , Limit Burst All allies gain Charge Bar, C.A. DMG Boosted (1 time), and C.A. DMG Cap Boosted (1 time) based on number of Machine Cell.
(Consumes all Machine Cell.) 
- Engage Augments
Notes
1B4C
Having main and support Huanglong along with the crew buffs provides 90% charge to everyone. Using Full Arsenal III![]() Gain C.A. Instant Standby, ATK Up (50%, Multiplier: Normal, 1T), and Chain Burst DMG Boosted (30%, 1T).
Gain C.A. Instant Standby, ATK Up (50%, Multiplier: Normal, 1T), and Chain Burst DMG Boosted (30%, 1T).
Level 30:
Also gain C.A. DMG Boosted (1 time) (20%) and C.A. DMG Cap Boosted (1 time) (10%).
or Splitting Spirit![]() Convert caster’s HP to charge bar (3% charge bar for every 250 HP consumed, up to 100% charge bar).
Convert caster’s HP to charge bar (3% charge bar for every 250 HP consumed, up to 100% charge bar).
(Consumes up to 50% of current HP.)
you can 4C with only a single button press.
Rotation
- Turn 1
- Full Arsenal III
 Gain C.A. Instant Standby, ATK Up (50%, Multiplier: Normal, 1T), and Chain Burst DMG Boosted (30%, 1T).
Level 30:
Also gain C.A. DMG Boosted (1 time) (20%) and C.A. DMG Cap Boosted (1 time) (10%). 
- Full Arsenal III
Notes
0B3C
An upgraded way to use the 90% charge from double huanglong is using the 10% charge from the Eternal Wonder on Tien to launch a 3C without any button presses.
Notes
1B2C Shion
Shion is a strong CA character with many gimmicks towards Katana characters and Katanas in grid. By maxing these bonuses, she does enough damage via her skill 2 Tempura Flurry
![]() 300% Fire damage to a foe (Damage cap: ~350,000).
300% Fire damage to a foe (Damage cap: ~350,000).
Gain Charge Bar (20%).
(Number of activations increased based on number of katana-specialty allies in party [Max: 6].)
and charge attack.
Notes
- All characters other than Shion can be subbed with other Katana characters.
0B2C
Upgrading to 0B2C requires using much stronger characters. Esser provides little for OTK requiring the other characters to compensate for her.
Notes
- Elmott can be replaced by any nukes on auto characters.
- Izmir can be replaced by
 or Shion
 .
.
0B0C1S
Calling Beelzebub is much easier than 0B2C thanks to both taking out a large chunk HP as well as the strength of the Bore debuff. Additionally, despite the call it is faster as well due to lower lock. Make sure to use a short animation skin like Rose Queen
 or Bellringer Angel
 ].
].
Rotation
- Turn 1
Notes
- Everyone can be swapped for GTA or auto nuke characters.
1B0C
The fastest setup available this year is using S3![]() 900% Fire damage to all foes (Damage cap: ~1,020,000).
900% Fire damage to all foes (Damage cap: ~1,020,000).
All Fire allies gain Fire ATK Up (100%, 1T) and Bonus Fire DMG (1 time) (30%, 1T).
All Fire allies instantly perform a normal attack without using up a turn.
(Consumes King’s Blaze after activation.)
. It is faster than a traditional 0C because free auto skills like it and Tag Team![]() All allies instantly perform a normal attack without using up a turn.
use skill lock. Additionally it is easier than 0B0C thanks to the large nuke, fire attack, and echoes.
All allies instantly perform a normal attack without using up a turn.
use skill lock. Additionally it is easier than 0B0C thanks to the large nuke, fire attack, and echoes.
Rotation
- Turn 1
- Percival (Grand)
 S3
S3 900% Fire damage to all foes (Damage cap: ~1,020,000).
All Fire allies gain Fire ATK Up (100%, 1T) and Bonus Fire DMG (1 time) (30%, 1T).
All Fire allies instantly perform a normal attack without using up a turn.
(Consumes King’s Blaze after activation.)
- Percival (Grand)
Notes
- Requires 100% TA on all characters.
- No Kaguya:
- GTA characters are used to reach 100% TA.
- Single Kaguya: 95%
- Kaguya: 25%
- Chain of Temptation: 25%
- Sword of Palla Militis x 2: 40%
- MA Awakening: 5%
- Double Kaguya: 80%
- Double Kaguya: 50%
- Chain of Temptation: 25%
- MA Awakening: 5%
- Missing TA rate can be aquired by:
- HalMal: 10%
- Colo Cane AX skills: up to 3%
- Ultima: 25%
- Not Reccomended
- Character EMPs
- Rings and Earrings
- No Kaguya:
- Buffer options are:
- Attacker options are:


